User Rating: 5 / 5

Star ActiveStar ActiveStar ActiveStar ActiveStar Active

love props show gm01 002

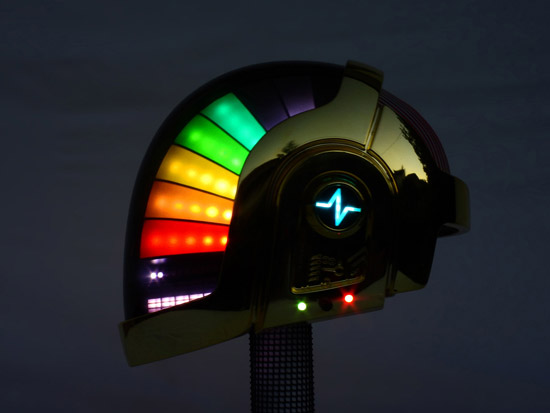
The designing, building and programming of the GM01 took more than one year of daily work. Finishing the unit with the desired quality was a huge oddissey. A hand made sculpting model, primed cast, great attention to the detail, perfect scale and custom electronics, code and libraries, make this unit more than a helmet.

The right concept, might be, an interactive light instrument. An easy to play and fully customizable device for composing music for the eyes. Everything housed on a high quality replica of the iconic GM helmet, paying special attention to the geometry lines and curves for making it such a unique and special piece. If you want more about it, in the following blog posts you can go deep into the making of the GM01:


 Building the master

 Molding and Casting 

Forming the Visor

 Hardware and Electronics

Software


User Rating: 5 / 5

Star ActiveStar ActiveStar ActiveStar ActiveStar Active

header

It was the first time the team tried to build a master completely of sculpted and sanded bondo. Bondo is a really good material to work with, but sometimes a little slow to achieve the desired geometry and finish. Everything starts by designing the 3D model. The tricky thing here is to build the model at the right scale, otherwise the helmet wont fit or it will look like a bubble-head. For solving that problem we built a paper version of our helmet. Three different versions were built until getting the right scale.


Once we got the paper version with the right scale, we covered it with a thin coat of bondo. This way the helmet will be strong enough for a one-usage mold of plaster of paris. Making this mold, we will be able to get a full bondo copy of the prototype built in paper. A good point to start sculpting the real thing.

User Rating: 5 / 5

Star ActiveStar ActiveStar ActiveStar ActiveStar Active

header

With the propousal of making a urethane copy of the master, we built a "glove" type mold. This mold consist on applying several silicone coats along the master surfaces untill forming a overlayed sking of 7/8 mm thick. That silicone "glove" will be then wrapped on a divided in sections bondo mother. This kind of mold is the perfect mate for a rotocasting job.

First of all we placed the master in a stable and fixed position, using a long stick screwed inside the model. Then cleaned the whole master with the airgun with enough pressure to ensure a completely clean surface. Once clean, mixed the first silicone to apply. We waited around 30 minutes after mixing, this way the silicone wouldnt be completely liquid and would be easier to apply to vertical surfaces. The most critical layer is the fist one, because it will transfer the surface to the copy, so it needs extra attention to cover all the surface to replicate with a thinn and homogeneous silicone film.

User Rating: 5 / 5

Star ActiveStar ActiveStar ActiveStar ActiveStar Active

header

Vacuumm forming, or thermoforming, consists on heating a plastic sheet in an oven and then form it against a mold, replicating a pressure chamber with the help of a vacuumm cleaner. This is the best/cheapest way of forming plastic sheets without industrial machinery.

The key thing here is choosing the right material. We had two options: a clear plastic sheet applying spray black tint on it after forming, or an already tinted material. The allready tinted material, guaranties an uniform tint all over the surface of the visor, while the spray black tint is more like an artistic work and the result is not an industrial  quality result. The thinnest, allready black tinted material, we found was a 3mm thick Acrylic. Knowing acrylic has a low stretch ratio, and the minimum thickness avaiable was 3mm we thought we would need at least a 500x700mm sheet to guaranty the complet form. This is a pretty big size if compared with a standar kitchen oven, so we decided to build one with the scale needed. 

User Rating: 4 / 5

Star ActiveStar ActiveStar ActiveStar ActiveStar Inactive

 hardware header


The original GM Discovery helmet was built in late 90´s with a simple and rudimentary electronic setup. Based on old generation RGB led bulbs, exclusive driver for every of those leds, tons of dangerous wiring connections and a high power consuption, the helmet required a huge backpack for making it autonomous enough for a photoshoot. Far from a practical object, was used in various iconic shoots but then replaced for a non-lighting version for public appearances.

The technology has evolved to a next level since then, and with it the possibility to build a practical, wearable and feature expanded version of it. A programmable autonomous unit capable of interacting with the user. For it, LoveProps designed a custom SMD PCB system that includes new generation hardware for interaction proposals. It's called SIGMA. Combining SIGMA, with other custom pannels specifically made for the GM01 lighting, this helmet it's a step closer to be the real robot that the original helmet was just pretending to be. 

Before building the hardware, we tried to include every necessary subsystems modules to obtain as a result an autonomous and flexible light instrument. With a Teensy 3.2 as a main processor, wich has more calculation processing that needed to execute real time codding with critic timming, we added various sensors, output and communication dispositives.


Hard1

©2024 LoveProps | T.+34 677 103 528 | services@love-props.com | Designed By Calma